This weekend my plan was to finish the rear axle. However I hadn't got round to buying a suitable sealant for the split gaiters. Therefore I decided to remove the petrol tank because it's clear that the body shell requires some welding and I don't want any explosions spoiling my day. There isn't much to removing the tank as it's held in by only four bolts. After these had been removed all that was needed was a bit of jiggling to lift the tank up. This gave access to the fuel line which was clamped before cutting. Here's a picture of the tank after extraction.
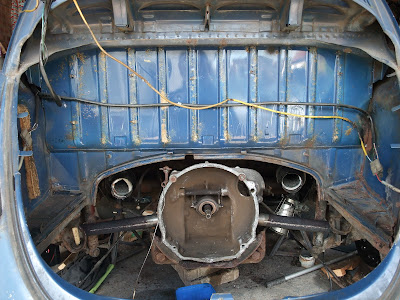
And this is the gaping hole where it used to sit. Notice that there was a lot of work done in this area before the car was laid up. It's not very neat but unless it turns out to be full of filler it appears solid.
The front apron (if that's the correct name for the panel) is clearly for an older left hand drive car. I know this because the steering box access hole is on the wrong side and the panel also has holes for bumper brackets (whereas the bumper brackets for this model come through the wings instead).
The tank was half full of petrol that dated from about 1985. I released the clamp from the fuel line and nothing happened. After a couple of minutes a small blob of gunk appeared but there was no further movement. Therefore I opted for pouring the petrol out through the filler pipe - here's what I got.
This neither looked nor smelled like petrol. In fact it had a very odd sweet odour which caused me to name it "smetrol" (I was going to call it "shitrol" but that isn't as child friendly). Regardless it would seem that I have a couple of gallons of premium quality smetrol - I wonder if anyone would buy it from me...
Sunday, 10 June 2012
Monday, 4 June 2012
Painting...
It definitely seems premature, but I actually needed to get some painting done on the Beetle today. The old swing axle gaiters were removed in a few minutes thanks to my stanley knife. However the tubes were too rusty to make an oil proof joint with the new gaiters - see below:
Therefore I decided a bit of painting was in order. I decided to try POR-15 as it seemed to get quite a lot of praise in the various forum articles I'd read. I ordered a tester kit from Frost. This kit comes with some marine clean (a degreaser), prep and ready (an etch primer) and a small tin of POR-15. Application is pretty straightforward but a tad fiddly with the components still on the car. The picture below shows the tubes after POR-15 has been applied. It gives a very smooth finish - it feels very like glass. It's best to overcoat when it's tacky. If it becomes completely cured then it needs to be rubbed down before the next coat is applied.
Notice also that the sound deadening has been removed and the original colour of the car can be seen quite clearly. It looks like the right had engine bay panel needs replacing and also both bumper mount panels. Time to learn how to weld...
Anyway, back to the painting. After two coats of POR-15 I risked top coating with Frost chassis black. I'll see tomorrow if applying this directly to the tacky POR-15 was a mistake or not. It certainly seemed to get a good grip and there didn't appear to be any reaction - time will tell. Here's what the axle tubes looked like after their first coat - ooh shiny!
Subscribe to:
Comments (Atom)


